User Guide on how to use and navigate Global Blue’s Middleware “Dashboard”.
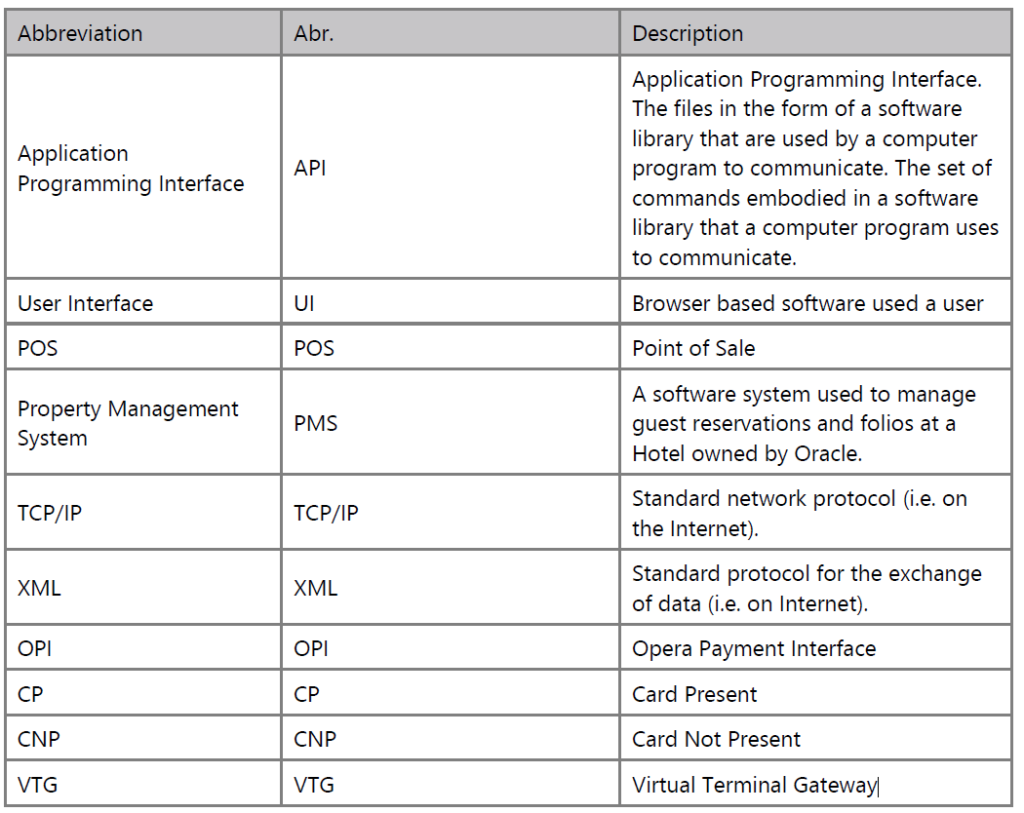
Terms & Abbreviations
Middleware Dashboard Overview
Middleware Dashboard: The dashboard is a browser-based User Interface designed as the central point of communication, deployed within Microsoft Azure for global configuration for all Middleware Agents deployed within an organisation.
Dashboard UI
Sidebar
The Dashboard is hosted within the Azure environment and the following section outlines the available options for a SUPER ADMIN/ADMIN User. Each section will be explained in detail further in the document.

Dashboard: The main landing screen that gives the user an overview of the sales, transaction, transaction status and sales by day breakdown.
Organisations: An area to view, create and delete an Organisation.
SSL Certificates: An area to view, create and delete certificates that can be used to help the Middleware Agent communicate with the POS/PMS or a terminal.
Users: An area to view, create, update and view pending invites for a user.
Billing: An area to create Billing Sets which control the fees set per transaction
Reports: An area to view and export Billing reports which can be generated using a host of options.
Terminal Types: An area to set up the types of terminals that will be in use with the Middleware Agent
Sites: An area to view, add and delete a site. A site is an entity under an Organisation.
Transactions: An area to view the outcome of transactions passing through a Middleware Agent.
Terminals: An area to view and filter on all the available terminals operating within the Organisation.
Dashboard
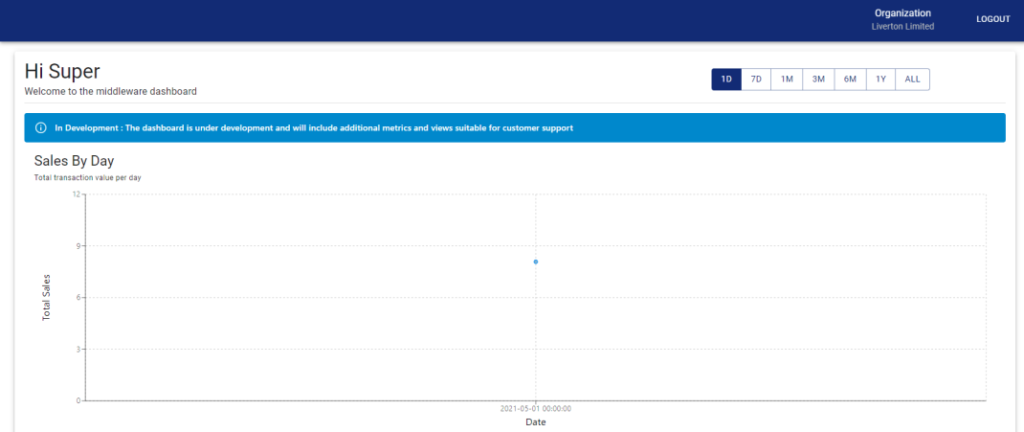
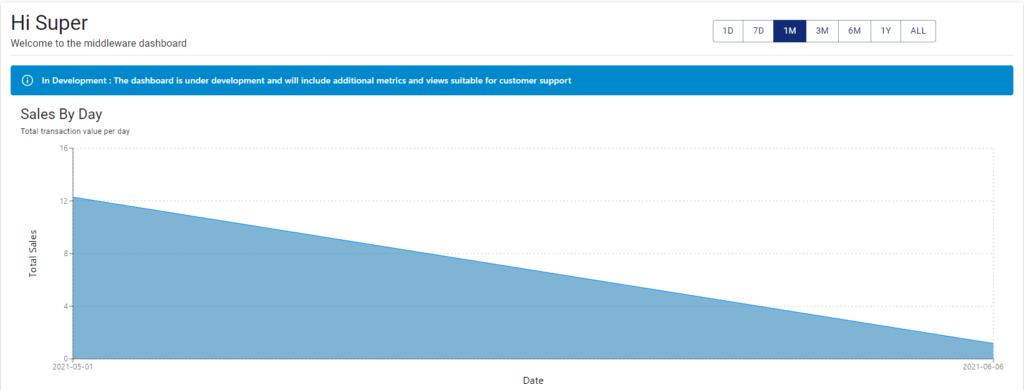
The Dashboard is a quick overview of all transactions within a particular organisation.
The total sales by day are shown in a graph format for ease of use. This can be filtered by the number of days the user would like to view the report. The date range runs from 1 Day, 7 Days, 1 Month, 3 Months, 6 Months, 1 Year and All.
Below the graph, the user can see a section that breaks down the sales totals into easier to understand categories such as completed vs not completed, approved vs declined, etc. This section is a cumulative reporting for all transactions till date and cannot be changed by the date selector in the previous section.

Organisations
Organisations are top level entities that can hold multiple smaller entities (sites) under them which each smaller entity acting as its own environment. E.g., Company A is the top-level entity but has smaller companies under it such as Company B, Company C, etc which can function independently. Changes in the Organisations can be made to affect sites or transactions at each site.
The user needs to first create an Organisation to avail the full functionality of the Middleware.

By clicking the “Create New” button, the user will be prompted to create a new Organisation and will be required to enter an easily identifiable name.

Once the name is entered, the user can click the “Create” button to complete the process. The user then should see the Organisation listed in the list of organisations.

By clicking the “Create New” button, the user will be prompted to create a new Organisation and will be required to enter an easily identifiable name.

Once the name is entered, the user can click the “Create” button to complete the process. The user then should see the Organisation listed in the list of organisations.

The user has further capability to update or delete the created Organisation by clicking the name to update or the red bin to delete. The user is prompted when trying to delete an organisation.

SSL Certificates
The SSL Certificates section stores the public and private certificates (known as Credentials in the Dashboard) used to communicate with a POS/PMS or a terminal. The user can add, delete or modify a credential from this section.

To add a new credential, the user must select “Create New” and provide a Friendly Name, a Passphrase or the password for decrypting the private key, a public key in .crt format, a private key in .pem format and whether the credential is to be used globally on the organisation.

Once the credential has been added, the user has the ability to edit or delete using the name or red bin to delete.
When trying to update/edit the credential, only certain fields are editable once a credential is created. Mainly the name, passphrase and whether it is a global credential. The screen displays the Subject name of the public certificate, the fingerprint and the validity of the public certificate.

When trying to delete a credential, the user will be prompted for confirmation before the credential can be deleted.

Users
The users section contains all the information pertaining to users who have access to the Global Blue Dashboard. On the main page under the Users menu, there are 2 sections, Current users and Pending Invites.
Current Users: All users that have been invited to the dashboard portal via an existing user and accepted the invite along with the roles they can perform on the portal.
Pending Invites: All users that have been invited to the dashboard but have not yet accepted the invitation.
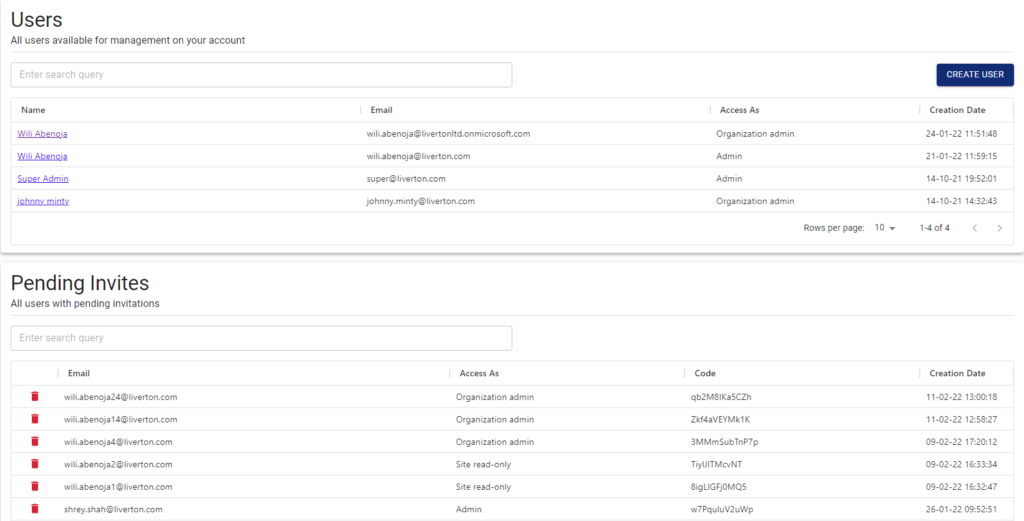
To invite a user to use the Dashboard, click the “Create User” button. The user will be prompted with a page to fill in all necessary details of the user to be invited.
Email Address: Email address of the user to be invited
User Role: There are 4 different roles that can be assigned to a user, they are:
1. Site read-only: Users will have limited functionality for the site they are assigned to under the main organisation. They will not be allowed to edit or delete any functionality of the dashboard.
2. Site admin: User will have edit and delete functionality for the site they are assigned to under the main organisation.
3. Organisation Admin: The organisation admin role allows the user to create, edit and delete sites, modify user roles and also control users within their organisation.
4. Admin: This role is a top-level user which combines all capabilities of the Organisation Admin and adds the ability to create new organisations. They are not tied to a particular organisation.


Organisation: In case the user has an Organisation Admin, Site Admin or Site Read-Only role, the user will need to be assigned to an organisation.
Site: In case the user has a Site Admin or Site Read-Only role, the user will need to be assigned to a site under the organisation.
Editing a user or their role is only available to Admins or Organisation Admins. To edit a user, click on the User’s name in the Users list.

Here one can update the user’s first/last name, the role that the user can perform and whether the user can access the dashboard via a “Enabled” flag. In addition, additional sites or organisations can be assigned to the user depending on the users’ current role. Password resets can also be initiated from this screen.

Deleting a Pending Invite is available to Organisation Admins, this will delete an invite that has not been accepted yet. Once deleted, the user can be invited to the portal again.
Billing
The billing section provides the user with the capability to create Billing Sets which set the pricing schemes for each site and each transaction passing through the Middleware Agent. Billing Sets can be created in this section and then applied to sites where applicable.

To create a new Billing Set, the user needs to select “Create” and provide a friendly name and default fee for the particular Billing Set.

Once a new set has been created, the user can update it with additional rules by clicking on the name.

The user will be presented with a chance to edit the friendly name or default fee of the billing set. The user can also add additional rules that can be applied to the incoming/outgoing transactions.

When adding a new Charge Rule, the user can select the type of transaction this rule applies to. A rule can apply to 1 or many types of transactions going through the Middleware. The fields are explained below:

Types of Transactions available: Auth (Authorisations), Complete, Top Up, Sale & Refund
Receiver Types available: IPPI (Global Blue definition) & OPI (Opera Payments Interface)
Card Modes available: CP (Card Present) & CNP (Card Not Present)
MID: Merchant ID
Fee: Price to apply for the rule.
Deleting a Rule can be done via the red bin icon on the left of the rule, same can be applied to the billing set as well on the list page.
Deleting a rule or billing set will result in a pop up being presented to the user to confirm that this action will be irreversible.

Reports
The reports section generates and displays graphs and list of transactions that have passed through the Middleware. This report can be modified to suit certain sites under the selected Organisation, can be grouped by Transaction Type, MID (Merchant ID), Receiver Type and Card Mode, the start date and the end date of the report.
Once all the fields have been set up according to the user requirements, the page reloads and displays the appropriate data.
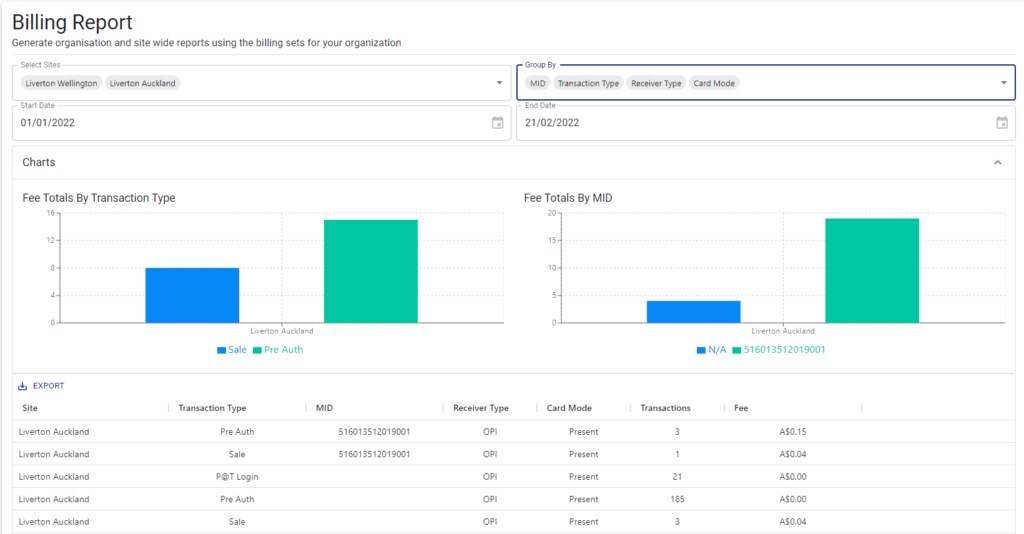
The transactions from the report can also be exported by selecting the “Export” button above the transactions list. This downloads the transactions in a .csv format.

Terminal Types
This section displays and allows a user to specify types of terminals available and each terminal types mappings.

A terminal type can be assigned to terminals which dictates to the Middleware what the terminal is capable of handling and only passing appropriate messages to it.
To create a new Terminal Type, click the “Create” button which brings up a pop up as below:

Friendly Name: Easily identifiable name for this type
Terminal Protocol: The language or type that the terminal will require communication in. There are 3 types currently available IPPI (JSON), VTG (JSON) and Windcave (XML)
Card Methods: Depending on the terminal protocol selected, the methods vary between Card Present or Card Not Present. The user can select 1 or both options depending on the payment terminals capabilities.
To edit the terminal type, click on the friendly name provided and the same pop up shows up with your current values filled in.

To delete the terminal type, click on the red bin icon on the list page. A confirmation pop up will show that this process is not reversible.

Sites
This section allows a user to create, edit or delete a site. A site is a unique entity which runs the Middleware. A list of currently set up sites are displayed in this section:

To create a site, click the “Create Site” button, a pop will be displayed as below:

When creating a site, it is important to note the Organisation it is being created under. In the example above, this site is being created under the Liverton Limited organisation. The fields for creating a site are detailed below.
Site Name: An easily identifiable name given to the site.
Site Mode: Whether this site functions with the Middleware Agent online or offline. Online means that the Agent will have connectivity outside its network and users will be able to log onto the Dashboard and collect stats. Offline means the Agent will run as a standalone piece of software and no reporting will be done to the Dashboard.
Contact Email: A contact email at the site
Contact Phone: A phone number for the site.
Currency: The currency that is applicable for the site.
Country: The country where the site is located.
Billing Set: Section to apply a specific Billing Set to this site.
Cloud Transaction Supported: Whether the site allows remote transactions to the Middleware Agent.
Once the site has been added with the above details, the site gets assigned a “Short Code” that needs to be provided to the Middleware Agent.

The user then needs to go back into the edit screen to configure additional details about the site.
To edit the site, click on the Friendly name given to the site. The site edit screen provides an overview of the site along with information of where the Middleware Connector is installed and its health status.

A site configuration page has 3 sections, Overview, Receivers and Terminals. The available configurations for the site are explained further in this section.
Overview
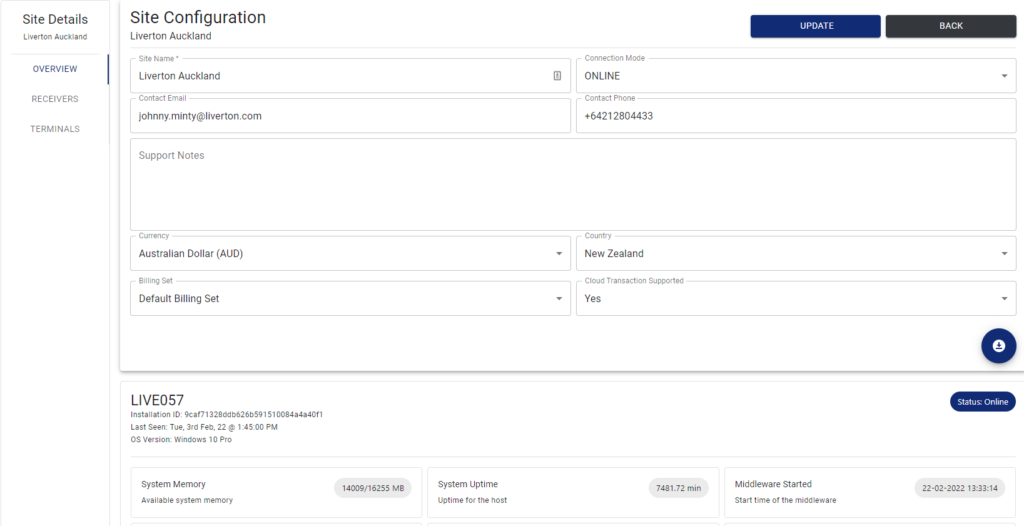
This section shows the site configuration with the details used while creating a new site. It also adds a “Support Notes” section for additional information that may be required for any user that views the site configuration.
The configuration page also allows for a download of the configuration for when the Middleware Agent needs to run in offline mode. Clicking this download button will download 2 files (configuration.json and sites.json) to be placed on the server where the Middleware Agent exists.

Further down, the overview page shows a list of Middleware Agents that may be connected to the site and some useful information for monitoring the Agent and its server. A site can also have multiple Agents connected to it.

The Agent health covers a whole host of information detailed below:
1. Status of the Middleware Agent (Online or Offline)
2. Installation ID: Installation ID given to the Middleware Agent
3. Last Seen: When the Middleware Agent was last seen online
4. OS Version: Operating system of the server running the Middleware Agent.
5. System Memory: Available memory on the server
6. System Uptime: Information on how long the server has been running without a restart
7. Middleware Started: When the Middleware Agent was started
8. Receiver Information: The types of receivers, the port and their status.
9. Terminal Information: The terminals connected to the Agent, their endpoint and their status.
Receivers
This section contains information about the Receivers connected to the Middleware Agent. A receiver is one end of the Agent that receives messages from a PMS/POS or Terminals.

To add a new receiver, click the “Add Receiver” button, this should bring up a pop up. Each of the fields are explained below:

Protocol: The type of messages the coming into the Agent. Currently there are 2 types of message types, OPI (XML) and IPPI (JSON)
Name: An easily identifiable name for the receiver.
Version: Version of the receiver (in case of IPPI, this could be the current IPPI version i.e. 2.9)
Port: The port that the Middleware Agent needs to listen to for incoming messages of this receiver type.
Pay At Table: Whether the PMS/POS supports Pay-At-Table messaging. Enabling Pay-At-Table means that the Terminal would be sending the request to the Agent rather than the PMS/POS. The PMS/POS would only respond back to the request.
F&B: Whether Food and Beverage is available on the PMS/POS.
Settlement Mode: This controls what the Middleware Agent will do when receiving a SETTLEMENT transaction.
1. By Workstation: This is the default behaviour that will use the WORKSTATION name provided in the request to send SETTLEMENT to a single terminal
2. By MID: You can select a list of MIDs to settle. Any terminals with a matching MID will be found and a SETTLEMENT request will be sent. When this mode is selected, a new field will be displayed for the user to select all the available MID’s

3. ALL Terminals: As per the name all terminals for a given site will be settled.
Endpoint IP/URL: The endpoint for the receiver for when Pay-At-Table is enabled.
Timeout: The amount of time to wait for a request/response.
Credential: List of credentials available for use for the receiver. The credential is a certificate that may be required to communicate with the receiver.
Cloud Transaction URL: If a PMS/POS supports cloud transactions, the URL to be set up on the PMS/POS will be displayed here. This field is not editable.
To Delete a receiver, click on the red bin icon on the list page. A confirmation pop up will show that this process is not reversible.

Terminals
This section refers to all the payment terminals set up at the site that are available for transactions.

Create Terminal
Terminals can be added in 2 different ways, adding a single terminal or bulk add. To add a new terminal, click the “Add Terminal” button.
The fields available for configuration are explained below:
Interface Type: Type of interface present on the terminal. Currently there are 2 types of terminals that can be interfaced with the Middleware Agent (Currency Select IPPI & Currency Select VTG).
Terminal Name: A friendly name given to the terminal.
Station ID/Workstation Name: A unique number given to the terminal or workstation which can be used by the Middleware Agent to pass through in the request.
Merchant ID (MID): Merchant ID, this is to be provided by the Payment Terminal provider. This field helps the Payment Terminal provider to direct transactions and payments to the right account.
Endpoint IP/URL: IP/URL of the terminal within the network.
DCC Enabled: Whether the terminal offers Dynamic Currency Conversion
Credential: List of available certificates that can be used to send to the terminal for additional authentication.
Connection attempts/retries: Number of times the Agent will retry to connect to the terminal/workstation before the terminal is reported offline or a transaction is counted as failed.
Connection Timeout: How long to wait on each request before a connection is accepted to count as a failed attempt.
Read Timeout: How long to wait for a reply back from the terminal
Order: How high up on the list the terminal should show up. Helpful for VTG (CNP) workstations where transactions need to be passed through before attempting any other terminal.
To bulk add terminals, click the “Bulk Add” button, this will prompt the user with a pop up as below. NOTE: A csv file will be required in the correct format to import terminals. The csv file should contain the following fields:

Once the file is available to upload, head over to the Bulk Add section. The following fields need to be filled in order to successfully add all terminals from the file.

Interface Type: Type of interface present on all the terminals. Currently there are 2 types of terminals that can be interfaced with the Middleware Agent (Currency Select IPPI & Currency Select VTG). This will apply to all the terminals that are being imported via the file.
Connection attempts/retries: Number of times the Agent will retry to connect to the terminal/workstation before the terminal is reported offline or a transaction is counted as failed.
Connection Timeout: How long to wait on each request before a connection is accepted to count as a failed attempt.
Read Timeout: How long to wait for a reply back from the terminal
File: Click the choose file button to upload the csv file with all the terminals
To Delete a terminal, click on the red bin icon on the list page. A confirmation pop up will show that this process is not reversible.


Edit Terminal
To edit a terminal, select the terminal by name in the terminal list. This will display a popup with the current values of the terminal configuration.

The user can then edit/update any field for that specific terminal. Once this has been done, click on “Update” to save the new configuration.
Transactions
This section covers the transactions going through the Middleware Agent for a particular organisation. A user can view, filter, sort and export all the transactions from this section.
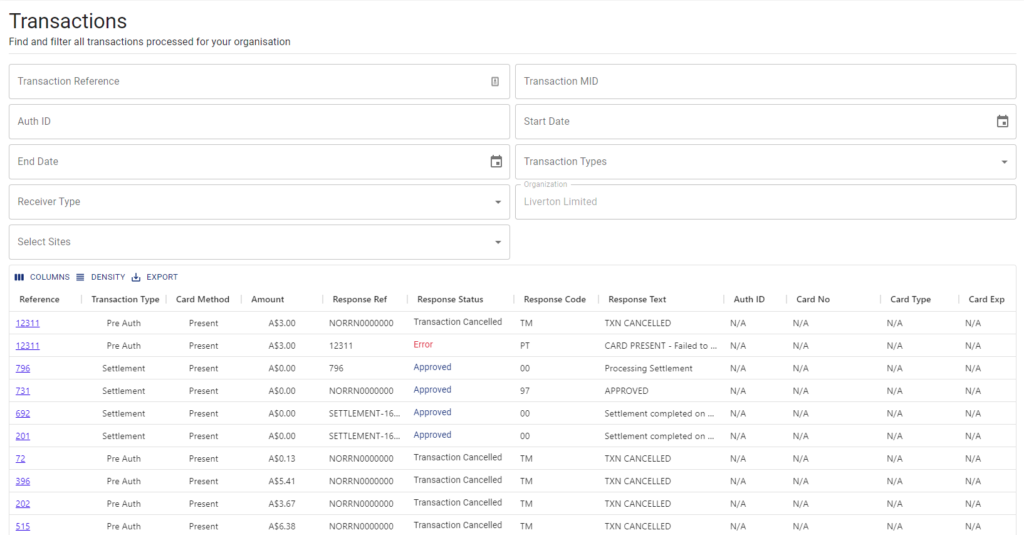
Transactions can be filtered via the following fields to narrow down the list:
Transaction Reference: A reference to the transaction that is identifiable by the PMS/POS or Payment Terminal.
Transaction MID: The MID for a particular terminal.
Auth ID: The Authorisation ID returned from the payment terminal.
Start Date: Date the user would like the results to be populated from.
End Date: Date the user would like the results to be populated until.
Transaction Types: Sort by different transaction types that have passed through the Middleware. (Values: SALE, SALE WITH CASH, REFUND, PREAUTH, PREAUTH TOP UP, PREAUTH RELEASE, PREAUTH COMPLETE, CAPTURE, CASH, VOID, REVERSAL, SETTLEMENT, TOKENIZE, INQUIRY, LOGIN, CHECK, POST PAYMENT, POST REFUND, DISCONNECT, PRINT)
Receiver Type: Sort by the type of receiver set up in the dashboard. (Values: IPPI, OPI)
Organization: Filter down results by organization.
Sites: Filter results by site(s)
Once the user has entered in their required values in the filters, the list is populated with the output. This screen shows all the available transactions which can be exported using the “Export” button. This allows the user to download the listed transactions in csv format or print as pdf.

Transaction Details
Select a transaction to view using the Reference field of the transaction. This brings up the details page which displays all the information gathered by the Middleware during a transaction.
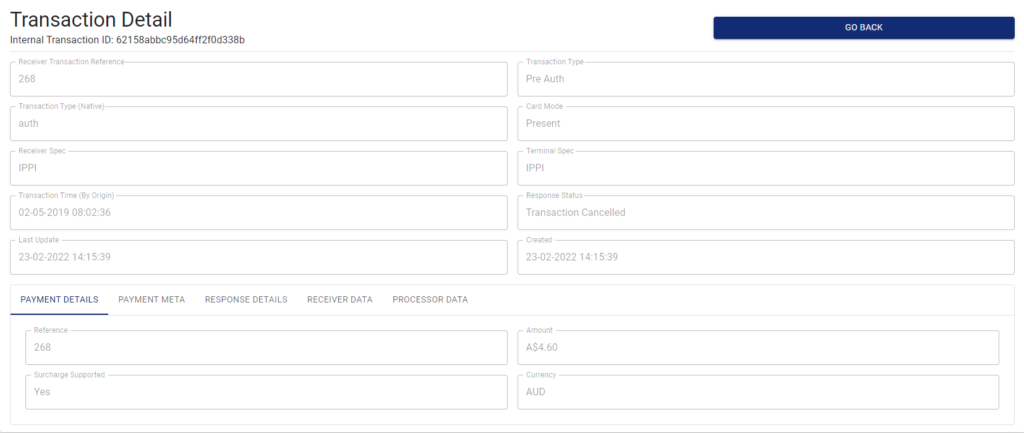
The details include:
Receiver Transaction Reference: The reference number passed from the POS/PMS to the terminal or vice versa (the origin of the transaction dictates the reference number)
Transaction Type: The type of transaction that took place (recognized by the Middleware)
Transaction Type (Native): Transaction type actually sent by the initiator.
Card Mode: Whether a card was required to perform this transaction or whether this transaction can be performed without a physical card.
Receiver Spec: The specification of the POS/PMS.
Terminal Spec: The specification of the terminal.
Transaction Time (By Origin): Date and time of the transaction occurring.
Response Status: Outcome of the transaction
Last Update: Last date and time of a response/request passing through the Middleware
Created: When the Middleware transaction was created.
Under these sections, more details can be found about the exchange that took place between the POS/PMS and Terminal.

Payment Details
A quick overview of the transaction with information such as the Reference Number (same as the Receiver Transaction Reference), Amount, Tax Amount, Surcharge Supported and Currency of the transaction.

Payment Meta
Metadata of the transaction which records information from the originating request and subsequent responses.
This includes:
Customer ID (Res or Invoice No): The reservation number or the order ID passed through in the request.
Workstation ID: The ID of the workstation that initiated the request
Workstation Name: Easily identifiable name for the workstation.
Workstation Version: Version of the software being run to initiate the transaction.
Site ID: ID of the site captured from the request data
Operator ID: ID of the Operator that initiated the transaction.
Check In Date: Check In date of the reservation for which the transaction is being processed.
Check Out Date: Check Out date of the reservation for which the transaction is being processed.
Merchant Type: Type of merchant the Site falls under.

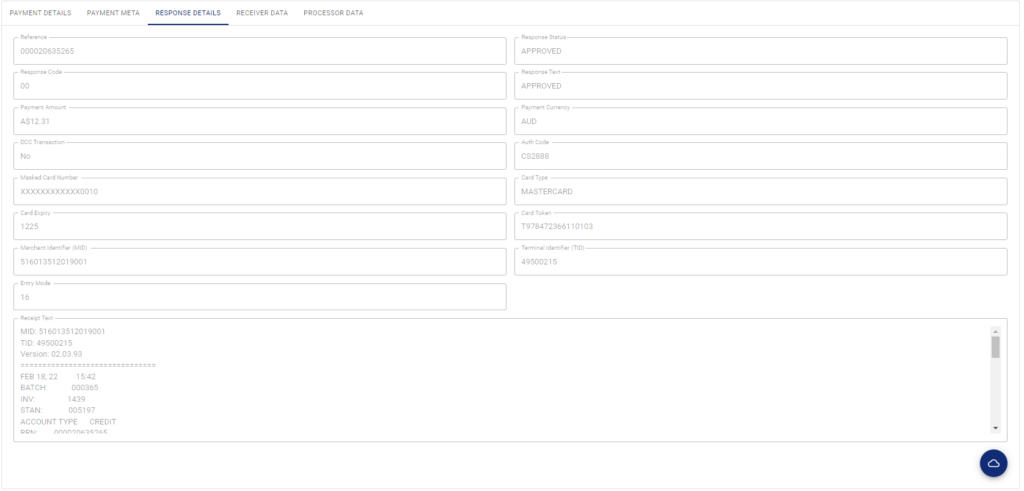
Response Details
Details gathered from the response coming back from the POS/PMS or terminal. This can include fields such as:
Reference: Internal Number on the POS/PMS or terminal provider.
Response Status: Outcome of the transaction.
Response Code: Numerical value of the response.
Response Text: Response text from the POS/PMS or terminal provider.
Payment Amount: Amount for the transaction
Payment Currency: Currency in which the payment occurred.
DCC Transaction: Whether the transaction consisted of DCC
Auth Code: Authorization code for the terminal from the terminal provider.
Masked Card Number: Masked card number sent back from the terminal provider.
Card Type: Type of card used for the transaction.
Card Expiry: Expiry date of the card used for the transaction.
Card Token: Tokenization of the card from the payment provider.
Merchant Identifier (MID): ID of the merchant for whom the terminal is set up.
Terminal Identifier (TID): Unique identifier for the terminal.
Entry Mode: Identifier for the terminal provider to gauge the card interaction with the terminal.
Receipt Text: Information printed on the receipt from the terminal.
An icon to download the receipt information is also present at the bottom-right, this will download the receipt information in a json format.

Receiver Data
This section displays the raw information stored from request and response from the POS/PMS. It also outlines the content type of the message and the remote server address (if present).
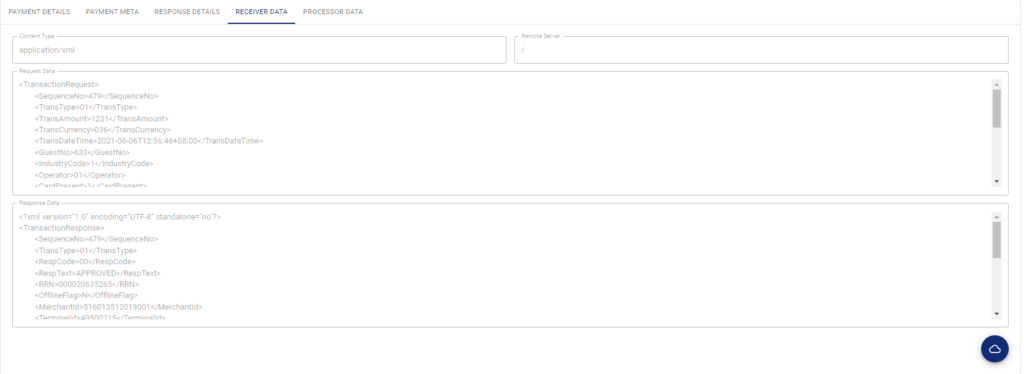
An icon to download the request and response data is present at the bottom-right of the screen, this will download the data in json format.

Processor Data
This section displays the raw information stored from request and response from the Payment terminal. It also outlines the content type of the message and the remote server address (if present).
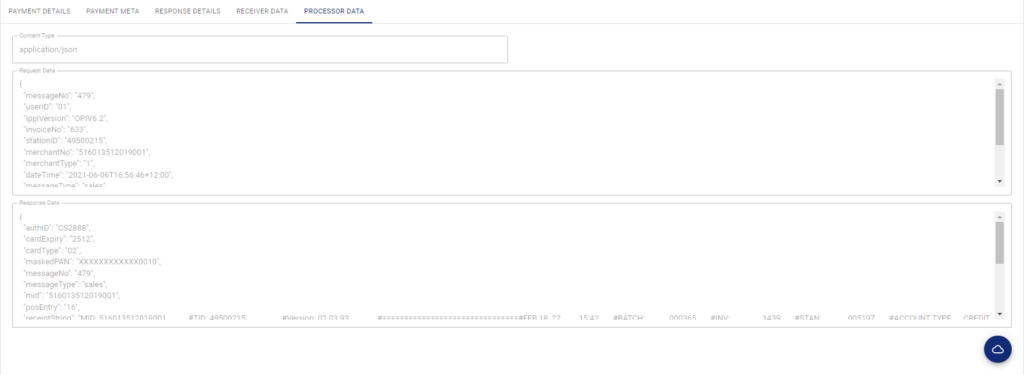
An icon to download the request and response data from the processor is present at the bottom-right of the screen, this will download the data in json format.

Terminals
This section lists all the terminals available for Organization with their mappings to workstations along with some filtering to sort through all the terminals.
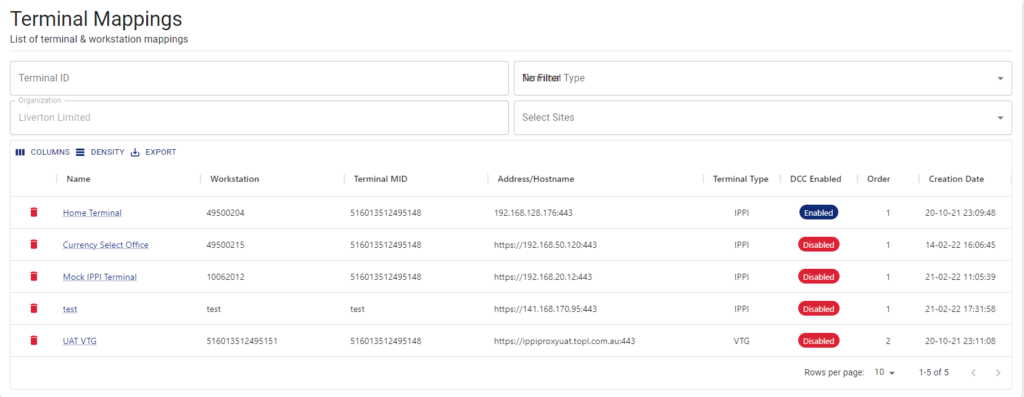
The list can be filtered using Terminal ID (unique identifier), Terminal Type (IPPI, VTG or WINDCAVE) and Sites.
The list of terminals can be downloaded or printed by clicking on the export button which will download the information in csv format or allow the user to print as a pdf.

When a user selects the terminal by name, a popup is displayed with all the information about the terminal which can be edited and saved. Refer to Site > Terminals > Edit Terminal for information displayed on this page.
